
One thing I love about becoming a baker is the creativity a person becomes exposed to. It is a field where you can dream up a concept and then it’s a matter of how to do it. So when I was given the assignment for a two tier wedding cake involving fondant, gum paste, pastillage, and intricate line work, my mind instantly had two thoughts, what is pastillage and Star Wars wedding cake. After finding out what pastillage was I was then able to draw a design to go with my concept and the more I planned out, the more ideas I was able to incorporate. Colours came easily, deep purple and royal blue with hints of silver. Large purple roses would play the centerpiece along with blue forget me not’s sprinkled around. There would also be a hand molded Millennium Falcon to sit on top of the cake next to cut outs of Han and Leia from Star Wars in pastillage. Then it was just a matter of starting.
Gum paste roses are a two day flower. A bud is shaped, placed on a wire, and hung to dry upside down overnight, this ensure the bud will be stable enough to hold the petals. The next day, the first set of petals are wrapped around the bud to create the center, these can be held down with water or an adhesive, water worked just fine. Then its just layering sets of petals until the desired size of the rose is achieved, as I wanted centerpiece roses, I layered three sets of petals. The finished roses are set to dry, generally in an egg carton to preserve the desired shape. The forget me not’s were a simple matter of stamping out of gum paste with a Wilton stamp and placing a silver ball in the center. After the roses were dry they were ready for airbrush colour. Layering a deep pink under the purple gave the flowers a brighter look. The roses were then again left to dry before going onto the cake.


The next step was pastillage. This was a challenge as it’s a product that dries very quickly, sets hard, and is very fragile. After cutting out silhouettes of the faces I wanted to make I then had to roll out a thin layer of pastillage to start cutting out. Using a sharp blade that was routinely dipped in alcohol was the easiest way to make smooth cuts. Once the shapes had been cut, and doubles, even triples, had also been cut, they were laid to dry and after a few minutes the edges were sanded with a fine grain sandpaper. The pieces were then put together with pastillage glue and royal icing which sets like cement, then put aside till they went on top the cake.

The fondant was the easiest to lay down, roll out to the size of the cake and smooth out, making sure not to stretch or tear. Once all smoothed out, the edges are trimmed to size. I also molded a miniature Millennium Falcon, as seen in the picture above, which was all done from a simplified picture of the ship. Fondant was also rolled out and then draped as a waterfall down the side of the cake, this would be the basis for the flowers and would also be dusted with silver pearl dust.
For added design, line work was done along the bottom of both tiers of the cake, this was all done with royal icing and made to look like scroll work. The royal icing also held down the draped fondant, the blue forget me not’s, and silver chocolate balls as accent pieces. The large purple roses were then placed in groups of three on the bottom and middle of the cake, this helped create balance and a focal point. The last part was to add the pastillage to the top, held down with more royal icing and pastillage glue.
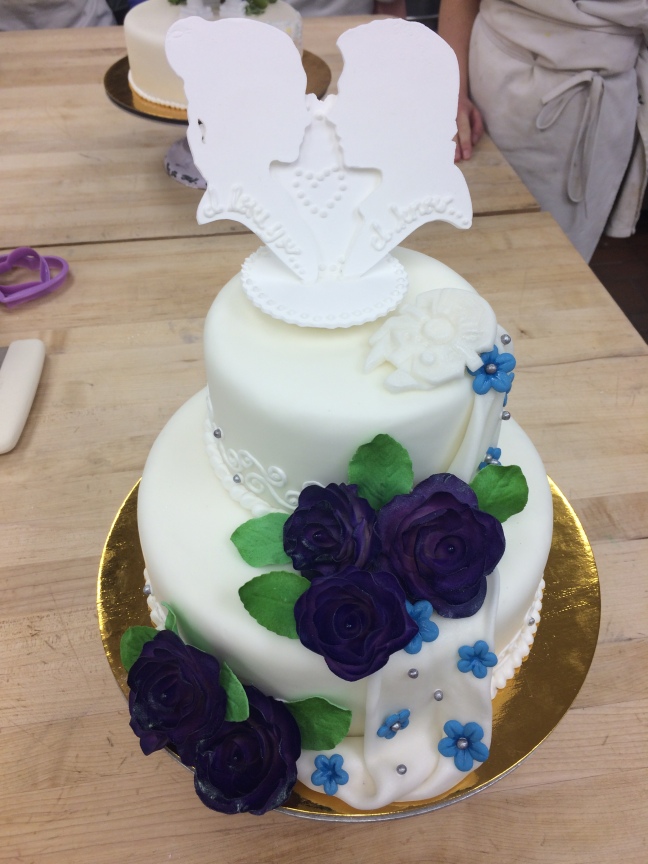
The end result was a geeky Star Wars wedding cake that created an elegant appearance with a wide appeal. Also, one of my favourite projects thus far as a baker.
